APR vs APY: what's the difference?
Understand the key differences between APR and APY, and how they affect your savings accounts, CDs, and even crypto investments.

The batch payments tool lets you create and send multiple transfers with one payment — by simply uploading a file. We built it for businesses that need to run international payroll to their customers, freelancers or employees. To pay recurring invoices and suppliers, or simply for those who just want to streamline their payment processes. And the pricing is the same as regular Wise transfers.
Are you a medium to large-sized business? Or would you rather automate payouts? Get in touch with our Sales team today
Scroll down to read everything you need to know about:
We recommend Control (Ctrl) F if you want to know about a specific topic.
The batch payment tool allows you to create and send many transfers in one go by simply uploading a file. You can then make a single payment to Wise to cover all transfers in the batch payment file.
The main benefit of using the batch payment tool is being able to create up to 1,000 transfers with a single file rather than setting up one transfer at a time. Some people may call a batch payment a bulk payment, mass payout, or mass payment.
It’s easy to create a batch payment. Below is an overview of the steps you need to take:
We’ve created different templates to help you get started with batch payments. They’re downloadable only in .CSV (comma separated value) format files that you can open using a spreadsheet app, like Microsoft Excel. There are multiple to choose from, so just use the one that works for you.

When you click on “Add row”, you’ll see the file being generated. You can keep adding more rows to your file - just make sure to edit one of the variables in transfer details (e.g. the “Transfer amount”).
When done, click “Download” and manually edit out all the rows where you see “e.g.” It’s possible to add other currencies or duplicate existing ones directly from the file. Just make sure that all the required columns for the target currency are present.
You can leave out “E-mail” and “Payment reference” rows blank as they’re optional.
Yes, you can payout to multiple currencies when using batch payments. Note that there can only be one “Source currency” per Batch file, i.e. if you’d like to fund your Batch in GBP and EUR currencies, you’d need to use 2 different templates.
Once you’ve opened the template file in a spreadsheet editor and filled in your transfer details, you can save your file as a .CSV (it should have .csv at the end of the file’s name) and upload the file right on your account page.
Once your account is verified, you'll be able to upload your batch payment. You can upload the file by dragging it into the dotted box on the batch payments page, or by clicking on “Select file” and manually uploading the file from the computer.
You’ll see all the transfers on the second step “Review transfers” once you’ve uploaded the batch file.
At the final step of the batch payment, you’ll be able to pay for your transfer. You’ll see two payment options: pay by local bank transfer and use balances already in your Wise Business account.
For Option 1, we’ll give you our bank details, and you can send the total amount of your batch to us via bank transfer. Once you have sent your bank transfer, mark your batch payment as paid by clicking "I have paid". When we have received money, we’ll pay out the correct amounts to each of your recipients.
For Option 2, you’ll be able to select to pay from one of your Wise Business balances. You can learn how to top up your balances here.
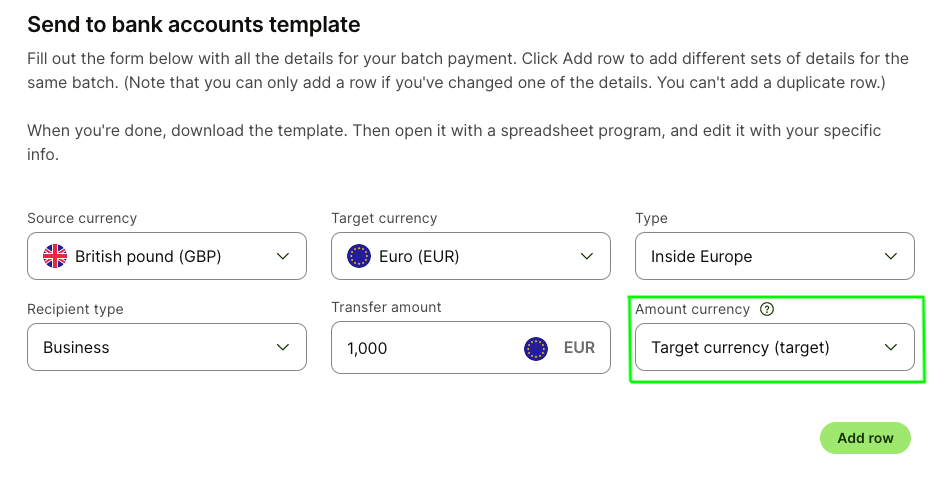
If you need to make sure your recipient gets a certain amount of money in their home currency, simply change “Amount currency” to “Target currency” and type in the amount you want the recipient to get. We’ll add the fee on top of the amount you’d pay in your source currency.
We recommend that you pay for your batch as soon as you upload your file to guarantee the rate. You can learn more about the guaranteed rate here. If for some reason you can't pay in straight away, your transfers will remain open for a few days before being automatically cancelled by our system.
You need to add your own bank account as a refund account, in case that you cancel one of the transfers or we need to refund any amount you’ve paid for the Batch. You can do this by going to “Recipients” from the Account page, adding your bank account details and marking them as “primary”. You can learn more about how to do it here.
If you’re paying for the Batch with your balance, you won’t need to add a refund account.
You can use Wise's batch payments tool with the Time Doctor platform to easily pay your overseas employees. If you already use Time Doctor for payroll, you can set up the Wise integration in Time Doctor.
Learn how to set up Wise integration in Time Doctor here.
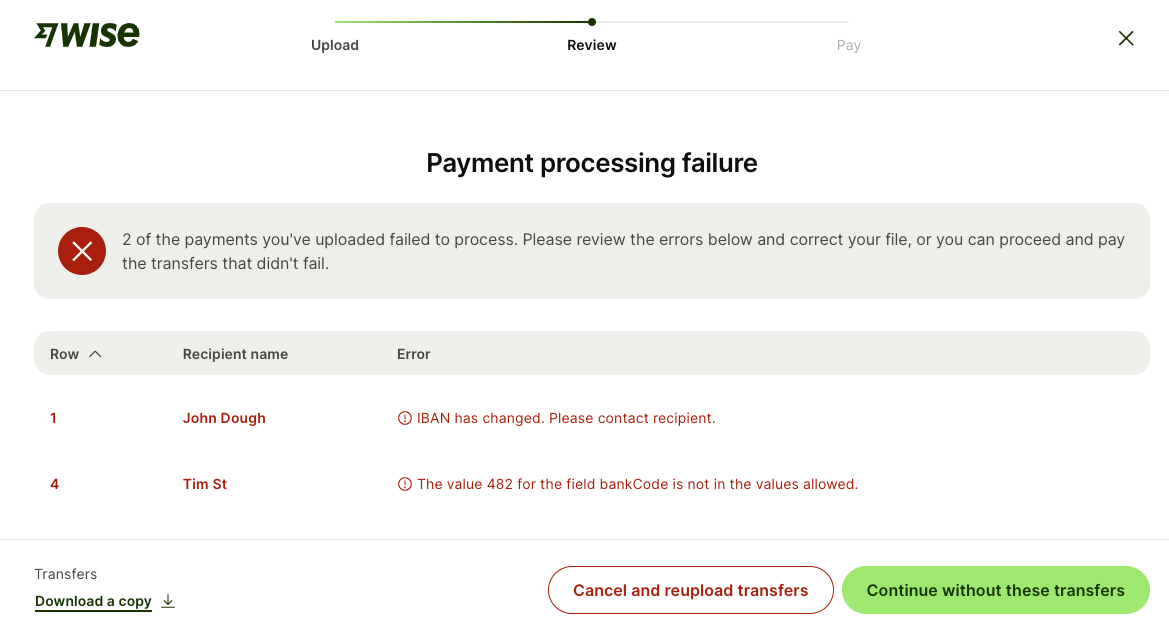
In case that there is an issue with any of the transfers in the Batch, we’ll let you know about it on the second step - “Review transfers”.
Whether the account or bank number is wrong, or there is something else missing about the transfer - you’ll be able to see it on screen.
You can then “Download a copy of these errors” and edit out the transfer details directly within the file. Once you’re done making the edits, save the file, click on “Cancel and reupload file” and reupload.
Alternatively, you can “Continue without these transfers” (that have errors) and keep the file with the errors that you can fix later.
If you’re interested in automating your payments, you can integrate with our open API.
Wise opened its API to help businesses streamline their workflows. By using it, not only can you automate payments — you can also connect your business tools to Wise, and create other ways to manage your finances.
There are no extra charges or premium subscriptions. And it only takes a few minutes to get your tokens.
Find out more here.
*Please see terms of use and product availability for your region or visit Wise fees and pricing for the most up to date pricing and fee information.
This publication is provided for general information purposes and does not constitute legal, tax or other professional advice from Wise Payments Limited or its subsidiaries and its affiliates, and it is not intended as a substitute for obtaining advice from a financial advisor or any other professional.
We make no representations, warranties or guarantees, whether expressed or implied, that the content in the publication is accurate, complete or up to date.

Understand the key differences between APR and APY, and how they affect your savings accounts, CDs, and even crypto investments.

Discover what FDIC insurance is, its limits, and the types of accounts it covers. Learn if your money is safe in banks, credit unions, and with CDs.

Grasp the meaning of APY in banking and CDs with our in-depth guide. Discover how APY impacts your financial choices and maximizes your savings.

Electronic money, or e-money, is a simple way to send, spend, and receive payments online. As we start to move away from cash or checks, e-money transfers are...

Wise is an online account that lets you spend abroad with your Wise card. To protect your account, we follow a set of rules set by regulatory agencies in...

You may have heard of ACH payment, but what is ACH? Find out what ACH stands for, what it can be used for, and the pros and cons of ACH transfer.